WSL
WSL provides a Linux environment on a Windows computer. Linux is an open source operating system that consists of many distributions, such as Ubuntu. Linux provides a terminal where you will be running commands to code and push your code to Github.
To get started, download WSL and Ubuntu (skip the following steps if you are using a Mac):
-
Open PowerShell as an administrator (Right click -> Run as administrator) and type
wsl --install -
After the installation finishes, restart your computer
-
After restarting, a command prompt or PowerShell prompt may automatically open asking for a username. Enter a username and password to create your account.
If no prompt opens, open up PowerShell as an administrator and run
wsl --install -d Ubuntu -
Open Command Prompt or PowerShell as a regular user (just click on Command Prompt or PowerShell), and type
wsl. The terminal’s prompt should change fromC:\Users\<username>to<username>@MSI:
Take a look at some Linux navigation commands. Learning how to move around in the terminal will be very helpful while coding in the future.
Visual Studio Code
VS Code provides a place to create and edit code. Follow the steps below to download VS Code onto your computer.
Setup
-
Install VS Code
-
When the installer asks to Select Additional Tasks, check “Add to PATH”.
-
Open VS Code. In the sidebar, click on “Extensions”. Search for “Remote Development extension pack” and install it.
Opening VS Code in WSL
-
Open Command Prompt/PowerShell and type
wslif you’re not in WSL already. -
Move to your home directory with
cd ~ -
Run the following commands to configure git:
git config --global user.email <your email>
git config --global user.name <your github id>
- Create and move into a vscode directory with:
mkdir vscode
cd vscode
-
Clone a repository, for example:
git clone https://github.com/nighthawkcoders/teacher.git -
Open the repository in VS Code with
code <repository name>(ex:code teacher). -
Check that VS Code is opened in WSL at the bottom left corner of the window:

Setting up Github Pages
Overview
You will want to create a Github Pages blog for this class. This is a place where you can code, complete the hacks and submit them through a review ticket, and record what you have learned.
Setup
-
Fork the student repository by clicking on “Fork”.

This will direct you to a page where you can give a name and description for your repository. Keep “Copy the main branch only” checked and then click on “Create fork”.
-
Once your repository is created, click on the green “Code” button and copy the HTTPS link provided.
-
In WSL, go to your vscode directory (
cd ~/vscode). Then clone the repository withgit clone <link copied from step 3>. -
Open your repository in VS Code with
code <repository name>. Now you can start code, code, coding!
Running Github Pages locally
You can run your Github Pages blog locally. This means that when you will be able to see your website update as you edit your code through a URL that starts with http://localhost. This is helpful because you can test locally to see if your code works, and push error-free code to your repository.
Steps
You can also view the steps in the student repository’s README
If using Windows, run the following commands in WSL (check out the comments if you’re interested in what the commands do):
# install Ruby
# apt install installs packages for Ubuntu
sudo apt install ruby-full build-essential zlib1g-dev
# avoid root user, set up a gem installation directory for your user account
# the following "echo" commands adds the installation directory into the .bashrc file
echo '# Install Ruby Gems to ~/gems' >> ~/.bashrc
echo 'export GEM_HOME="$HOME/gems"' >> ~/.bashrc
echo 'export PATH="$HOME/gems/bin:$PATH"' >> ~/.bashrc
# run the .bashrc file so that WSL knows the installation directory
source ~/.bashrc
# install jekyll and bundler
gem install jekyll bundler
If using MacOS, run the following commands in the terminal:
# ruby
brew install chruby ruby-install xz
ruby-install ruby 3.1.3
# configure ruby into shell .zshrc or change to .bash_profile
echo "source $(brew --prefix)/opt/chruby/share/chruby/chruby.sh" >> ~/.zshrc
echo "source $(brew --prefix)/opt/chruby/share/chruby/auto.sh" >> ~/.zshrc
echo "chruby ruby-3.1.3" >> ~/.zshrc # run 'chruby' to see actual version
#
# quit and relaunch terminal
#
# install jekyll
gem install jekyll
-
Open your terminal in VS Code through View -> Terminal. Alternatively, the shortcut
Ctrl + `can be used. (You can also run the commands in WSL, but opening up VS Code’s terminal in your student repository ensures you are in the correct directory.) -
Type
bundle install. This command installs the dependencies in your Gemfile. -
Type
make. This compiles the program. -
Go to the localhost link provided in the output:
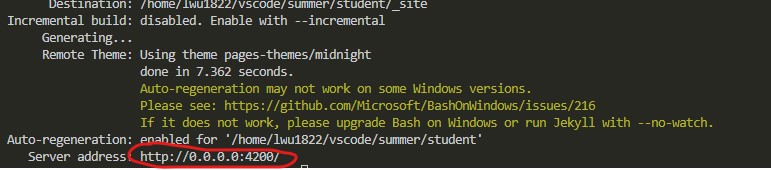
Now, whenever the blog is edited in VS Code, the local website will show the changes upon refresh.
Please note that these changes are only stored locally on your computer until you commit the changes. If you go to your actual blog on the web (https://
Give Github Pages a custom domain
Overview
AWS Route 53 is a DNS service that provides routing to web applications. When you enter a URL in your web browser, the request is sent to a DNS resolver. The resolver finds a Route 53 server that can translate the URL into its corresponding IP address. The Route 53 server sends the information back to the resolver, who then sends it to the browser. The browser is able to access the webpage through the IP address it received.

In addition, you can use Route 53 to create a domain that maps to your Github Pages blog. In the example below, the domain https://lily.nighthawkcodingsociety.com/ will point to https://lwu1822.github.io/student/.
Steps
AWS
-
Go to AWS Route 53, and click on “Hosted zones”.
-
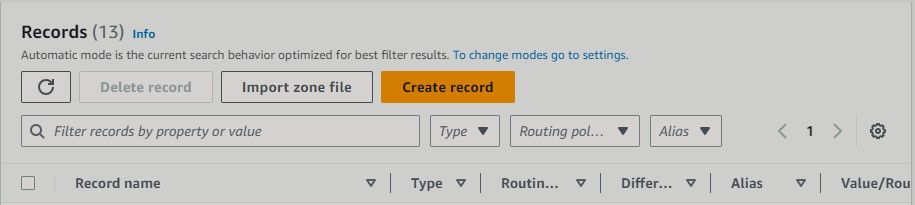
Click on “Create record”.
-
Create a subdomain in “Record name”. Change the “Record type” to CNAME. CNAME creates an alias that maps one domain name to another domain. Finally, in the “Value” section, enter your Github URL in the form of:
<username>.github.io. Be sure to omit the link to your repository.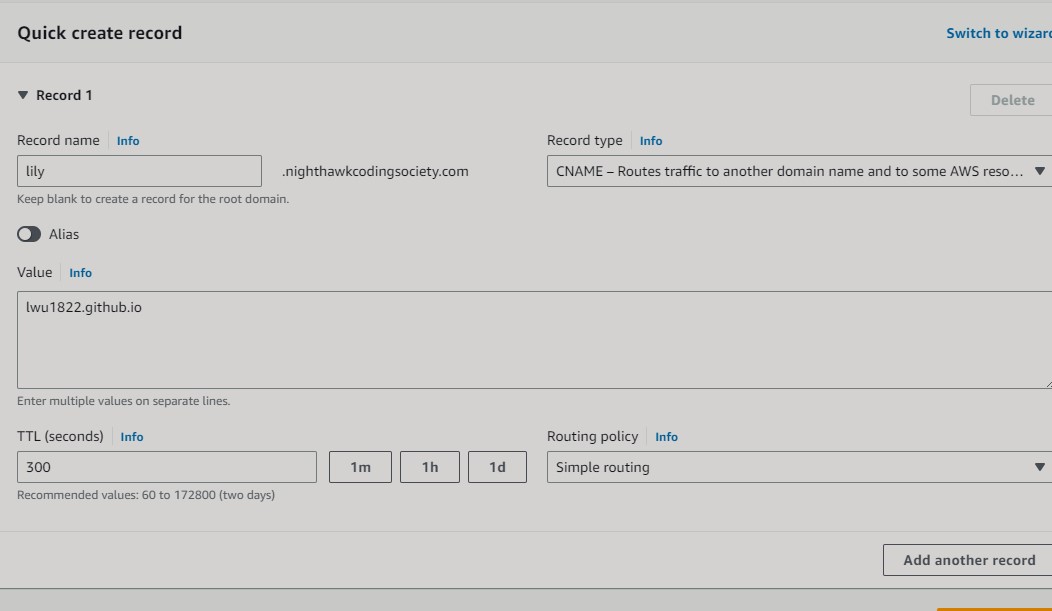
-
Click on “Create records”. Your record should look something like this:

Github Pages
-
Create a Github pages repository and click on “Settings”.
-
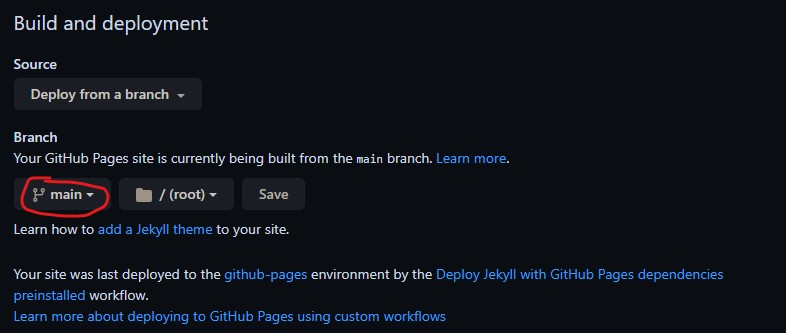
In the sidebar, click on “Pages”. Under “Build and deployment”, ensure that the Github Pages is being built from the main branch. If you forked nighthawkcoders/student, you might need to specify that before you can move on to Step 3.
-
Enter the domain you configured in Hosted zones.

Github pages will run a DNS check. Once the check is successful, access your Github pages with your new domain name (ex: lily.nighthawkcodingsociety.com). The domain should redirect to your Github Pages blog.
Troubleshooting: If the check is unsuccessful, check to see that you did the “AWS” steps properly. Also check to see if you spelled the domain correctly in Github Pages. If that does not work, delete the record in AWS and create it again. (It took me multiple times to get it to work, even though I typed the correct domain name. So if you encounter this error, you may have to be patient.)
-
Click “Enforce HTTPS” so that the domain will be accessed over HTTPS.
Afterwards
In _config.yml, change the line that says baseurl to:
baseurl: ""
This ensures that Github Pages is formatted correctly. This is because originally, the Github Pages site was under the subdirectory student (ex: lwu1822.github.io/student). After configuring a domain/subdomain, the baseurl would be “” since the URL would look like https://lily.nighthawkcodingsociety.com/ (no subdirectory).
Troubleshooting
dig
dig is a Linux command that outputs DNS information, which can be used for troubleshooting.
Run dig <your subdomain> to check that the subdomain and the Github URL it points to is properly configured.
dig lily.nighthawkcodingsociety.com A

; <<>> DiG 9.16.1-Ubuntu <<>> lily.nighthawkcodingsociety.com A
;; global options: +cmd
;; Got answer:
;; ->>HEADER<<- opcode: QUERY, status: NOERROR, id: 14554
;; flags: qr rd ad; QUERY: 1, ANSWER: 5, AUTHORITY: 0, ADDITIONAL: 0
;; WARNING: recursion requested but not available

;; QUESTION SECTION:
;lily.nighthawkcodingsociety.com. IN    A

;; ANSWER SECTION:
lily.nighthawkcodingsociety.com. 0 IN   CNAME   lwu1822.github.io.
lwu1822.github.io.      0       IN      A       185.199.111.153
lwu1822.github.io.      0       IN      A       185.199.108.153
lwu1822.github.io.      0       IN      A       185.199.109.153
lwu1822.github.io.      0       IN      A       185.199.110.153

;; Query time: 0 msec
;; SERVER: 172.30.208.1#53(172.30.208.1)
;; WHEN: Thu Jun 15 22:45:36 PDT 2023
;; MSG SIZE  rcvd: 192
In the ANSWER SECTION, check to see that the CNAME line maps the subdomain to the Github URL.
The four IP addresses below the CNAME line are the IP addresses for Github Pages.
Accessing the custom domain name returns a default Nginx page
While accessing the custom domain for the first time, you may encounter the default Nginx message or the default page for whatever web server was used instead of Github Pages:
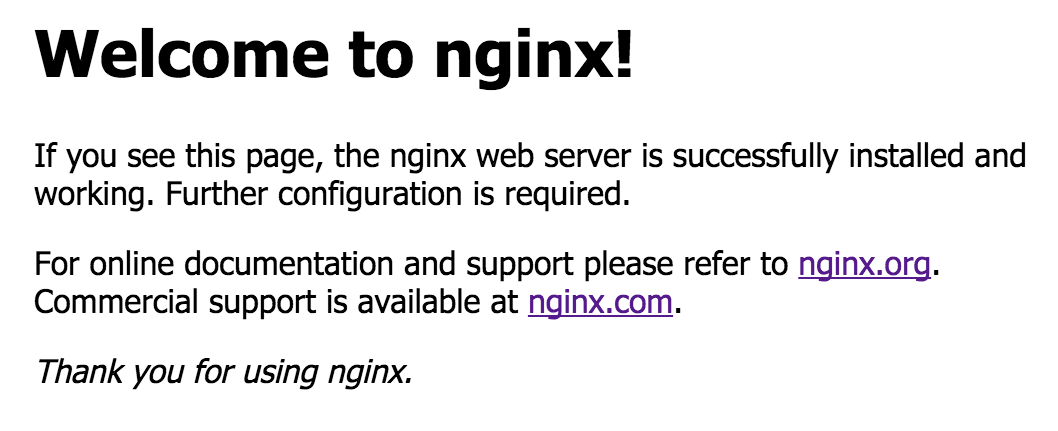
This issue may occur if you had accessed the custom domain in your browser before you configured it in Github Pages.
I tried refreshing the page multiple times, but the message persisted. Even after twelve hours, the message was still there. I then opened up the “Network” tab in Chrome Dev Tools, and reloaded the page. For some reason, the Nginx message changed to my Github Pages.
I’m not sure if this solution always works, so a backup method is to open up another browser and paste the custom domain into the search bar.